Domain Management
The Domains section provides centralized management of all network domains associated with your project, including those for TagoIO Admin, TagoRun applications, APIs, middleware services, and MQTT brokers. This interface enables project owners to view, configure, and monitor the domains that serve as entry points for various services within the project infrastructure. The domain list displays essential details such as the domain URL, routing target, destination, and operational status.
Important: Middleware domains are visible and configurable only by project owners. Collaborators do not have access to view or modify middleware domains, ensuring that sensitive routing and service configurations remain secure.
Understanding Domains
Domains are network addresses that allow users and systems to access different components of your project. Each domain is mapped to a specific service or application, providing a clear and organized structure for managing access and connectivity.
The main types of domains managed in this section include:
- TagoIO Admin Domains: Provide access to your project's administrative interface.
- TagoRun Domains: Serve as URLs for your TagoRun applications, enabling user access to custom interfaces.
- TagoIO API Domain: Defines the network endpoint for interacting with the TagoIO API.
- Middleware Domains: Route traffic to middleware services integrated with your project.
- MQTT Broker Domains: Specify network addresses for MQTT broker connections, supporting IoT device communication.
Domain Information
For each configured domain, the domain list displays the following attributes:
- URL: The full web address or endpoint that users or systems will use to access the service.
- Target: The specific service, component, or environment to which the domain is mapped.
- Routed To: The backend destination where incoming traffic is directed.
- Status: The real-time operational state of the domain (e.g., active, pending, error).
This information enables efficient management and troubleshooting of network routing and service access.
Creating and Configuring a New Domain to a Profile
To add a new domain to your project, follow these steps:
- Head to the TagoDeploy console and go to your project's Domains section.
- Set the Subdomain: Enter the desired prefix (e.g.,
admin,api,mqtt) to use as your subdomain. - Enter Your Main Domain: Type in your primary domain (e.g.,
yourcompany.com). - Choose the Destination: Select the service or component (such as TagoIO Admin, TagoRun, API, middleware, or MQTT broker) that the domain should point to.
- Click Add Domain to create your new domain entry.
- Next to the domain you just added, click the three-dot menu and select Edit Domain.
- Copy the Endpoint and SSL Certificate CNAME records provided, then add these records to your DNS provider’s settings.
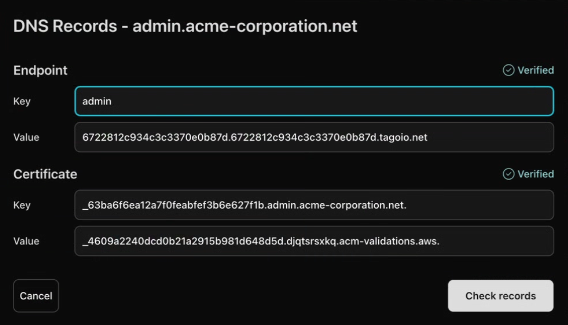
- Wait a few minutes for DNS propagation. You can check the status by clicking Check Records.
- Once the DNS is set up, copy the URL from the domain list and open the Run module in your TagoIO Profile and add the new domain under the Domain section.